
 Next job is to start shaping the bowl with the straight whittling knife. The pic below shows the rough shaping.
  And an overall view showing some material removed from the handle as well.
 I got the wife to take some photos of the roughing out knife cuts on a different spoon to illustrate the techniques. The first one is the 'chicken wings'. The first point to note here is that the elbows and upper arms are braced tightly against the chest, isolating the hands and permitting control. Also the cut is started at the hilt end of the blade so that as the cut progresses, a slicing action is introduced making the cut far more efficient.
 Here is the end of the cut, the elbows remaining pulled into the chest. Before you start the cut be aware of other people nearby, especially in the arc the knife tip will take as it leaves the wood. Also just be aware of the position of the hand holding the spoon so that you don,t catch it with the tip of the knife. A lot of power can be imparted into the cut using this technique.
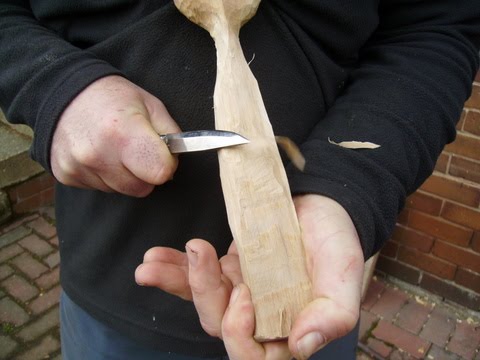
 Here's another cut, this time with the blade travelling towards you. The strength is in the leverage at the thumb joint. The cutting action is just the clenching of the knife handle into the palm. So at the start of the cut the fingers are open, and as the cut progresses the fingers curl tightly into the palm. This means that the length of travel is limited and the blade doesn't come anywhere near the thumb. If you're working near the edge, of say a bowl, then keep the thumb below the point where the knife leaves the wood. Note again that a slicing action is much more efficient.

Finally for this time, another slicing cut towards the body - useful for shaping the handle. Note how the spoonbowl is wedged into my chest for support and the thumb is bracing the other end. Hopefully it's clearer to see here how a slicing cut is achieved by lowering the knife hand as the knife is drawn towards the body.


These are the 3 basic knife cuts that I have used to get to this point (much more difficult trying to explain in words than to demonstrate face to face!) so next time I'll maybe show some detailing cuts and spoon knife grips.
Here's how we're doing with our Sycamore spoon so far:-
 Cheers for now
Hello there!
ReplyDeleteLovely work mate, and some really nice tools on show too. Keep the posts coming!