Friday 25 September 2009

Latest Projects

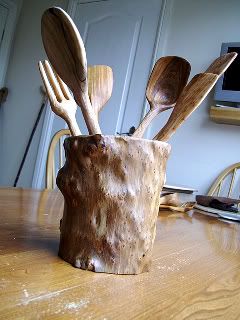
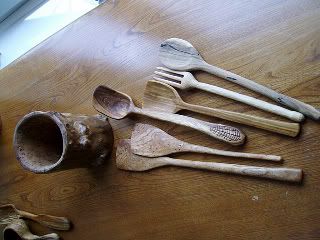
Sorry I haven't posted for a while, I've had ligament reconstructive surgery on my knee which turned out to be a much more arduous rehab than I expected. Nevertheless, I have been quite busy, but alas I still keep forgetting to take photos of most of the stuff I make. Here at least are some recent bits and bobs I have turned out. My colleague's daughter got married this summer so I made them a kitchen treen set as they are both keen cooks

Most of the pieces, including the pot are Elm, though the spoon is Beech and the fork is Pear.


As it happens the same colleague is retiring after 31 years service so it fell on me to make him a presentation plaque. The old axe was acquired from ebay a while ago and just needed de-resting and cleaning.
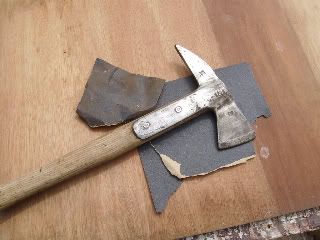


It was then taken to the local chromer's for coating.


Meanwhile I selected some English Oak to make the plaque. This was simply squared off and edge routed with a moulding bit


This is the plaque finished, unfortunately the photo was taken with my phone.The axe is mounted on the plaque via 5/8" Oak dowels.


Finally for now here's another little project I did for a friend


When I make these I first compose and print the font on the computer. I then trace the outline of the letters onto the timber using Saral. I then rout to a depth of about 4mm using a 2mm bit. Tight corners and details can be crisped up using small gouges and chisels. Before painting the letters I apply sanding sealer to stop the paint flooding into the grain around the letters. This is particularly important when using an open grained such as I have done here with this Oak. Finally finish with the preferred medium; in my case about 5 or 6 coats of Danish Oil.
I'm doing a bit of demonstrating tomorrow so I'll try and think on and take my camera to take a few snaps.


Tuesday 9 June 2009

Jewellery Box

Right, I think its about time I got stuck into a bit of woodwork. Over the last week and a half I've been working on a commission the wife dropped on me with virtually no notice- cheers! It's one of her friends' 50th birthday next week so she wanted something"special" making. As I had no time to design something myself I shamelessly copied a design for a jewellery box I had seen at the Bodger's Ball (annual gathering of Uk green woodworkers at Cusworth Hall) by Sean Hellman. My apologies for the plagiarism Sean.
Sean makes loads of lovely craft items such as this, besides his larger commissions so I would thoroughly recommend looking out for him at events.
For this box I used Sycamore for the main body of the piece, Elm for the lid and some Elm Burr/ Burl for the hinge posts. I used some brass rod (ex- stair rod) for the hinge pins.The finish is Danish oil buffed with some Carnuba wax. Ideally I would have liked to have dedicated more time to the finish but Hey-Ho no such luxury.


Elm has got to be right up there with Walnut as my favorite timbers to work with. I am currently working on some pots made from Pippy Elm that are my take on Shrink boxes. They are ideal for kitchen treen containers to give as a gift set- I'll make these my next Blog post.
This project saw the first of my coin stash brought into play. Luckily the sixpence is a hair smaller in diameter than a 19mm Forstner bit, so a bit of gentle persuasion got me a nice tight fit


Unfortunately I didn't think to take any WIP photos (must start doing that), but here's some of the stock I started with T-B Burr Elm, Elm, Sycamore


As you may be able to gather I am very much a blue collar bloke so my apologies for grammatical errors etc. Also I have noticed on some blogs they have small photos that can be made larger by clicking. How is this done? does it just happen automatically when you select large size on image upload?
Coming soon- Hollow Pots and making walking sticks..


Friday 29 May 2009

Old coins

I went to the viewing day at a local auction house the other day. Most of the lots on show were house clearence tat, but there were a few lots that caught my attention. I didn't go to the auction proper, but left instructions with the wife's uncle on how much to bid on my behalf. I only won one lot as it happens, but it was he lot I was most interested in- this tin of mixed predecimal coins:- My plan is to dicretely incorporate a coin representing the DoB when I make a wooden piece as a gift. Luckily there are a good spread of years represented, especially sixpences which are the ones I have been intending to get hold of for a while.
As I was rumaging through I noticed this William III penny from 1699. I think it will have been legal tender up until decimalisation in 1971- best part of 300 years. Its fascinating to think how many generations of people, in so many different circumstances, must have handled this coin through the ages.


I'm at home recovering from a knee ligament reconstruction at the moment, so I'm unable to do very much, but I have been doing some spoon carving and made my first walking sticks-pics to follow


Tuesday 19 May 2009

Greenwood carving tools


These are the tools featured in my header, and the ones I use for 90% of my greenwood carving projects. They are, from L-R, a Helgess RH spoon knife, a Frosts 106 sloyd knife and a Gransfors Bruks Carver's axe. These were the tools that were used on a spoon carving course I attended at the workshop of Robin Wood in Derbyshire, 2 years ago. Since acquiring and using these tools I have tried a few other patterns and makers, but none have surpassed the results I have had with these. I do however have an open mind so I will be trying others and will post my findings on here in due coarse. I will also post some of the different methods I employ to sharpen my edge tools-a subject that eveyone seems to have a different slant on.